

- Published on
เมื่ออยากมี Tools ส่วนตัวใช้ในชีวิตประจำวันผ่าน LINE
ขอบคุณรูปภาพจาก https://bs-uploads.toptal.io
จุดเริ่มต้นทั้งหมดเริ่มจากผมได้ไปดู Video ของคุณ dtinth ชื่อ Video ว่า Let’s build a personal assistant bot and level up your coding skills! เมื่อผมดูจนจบ ผมสนใจมากๆ(ค่อนข้างจะตื่นเต้นกับอะไรที่ไม่เคยทำ) และผมได้เริ่มทำมันทันที !!
สำหรับคนขี้เกียจอ่านทั้งหมด
ทำอะไรไปบ้าง ?
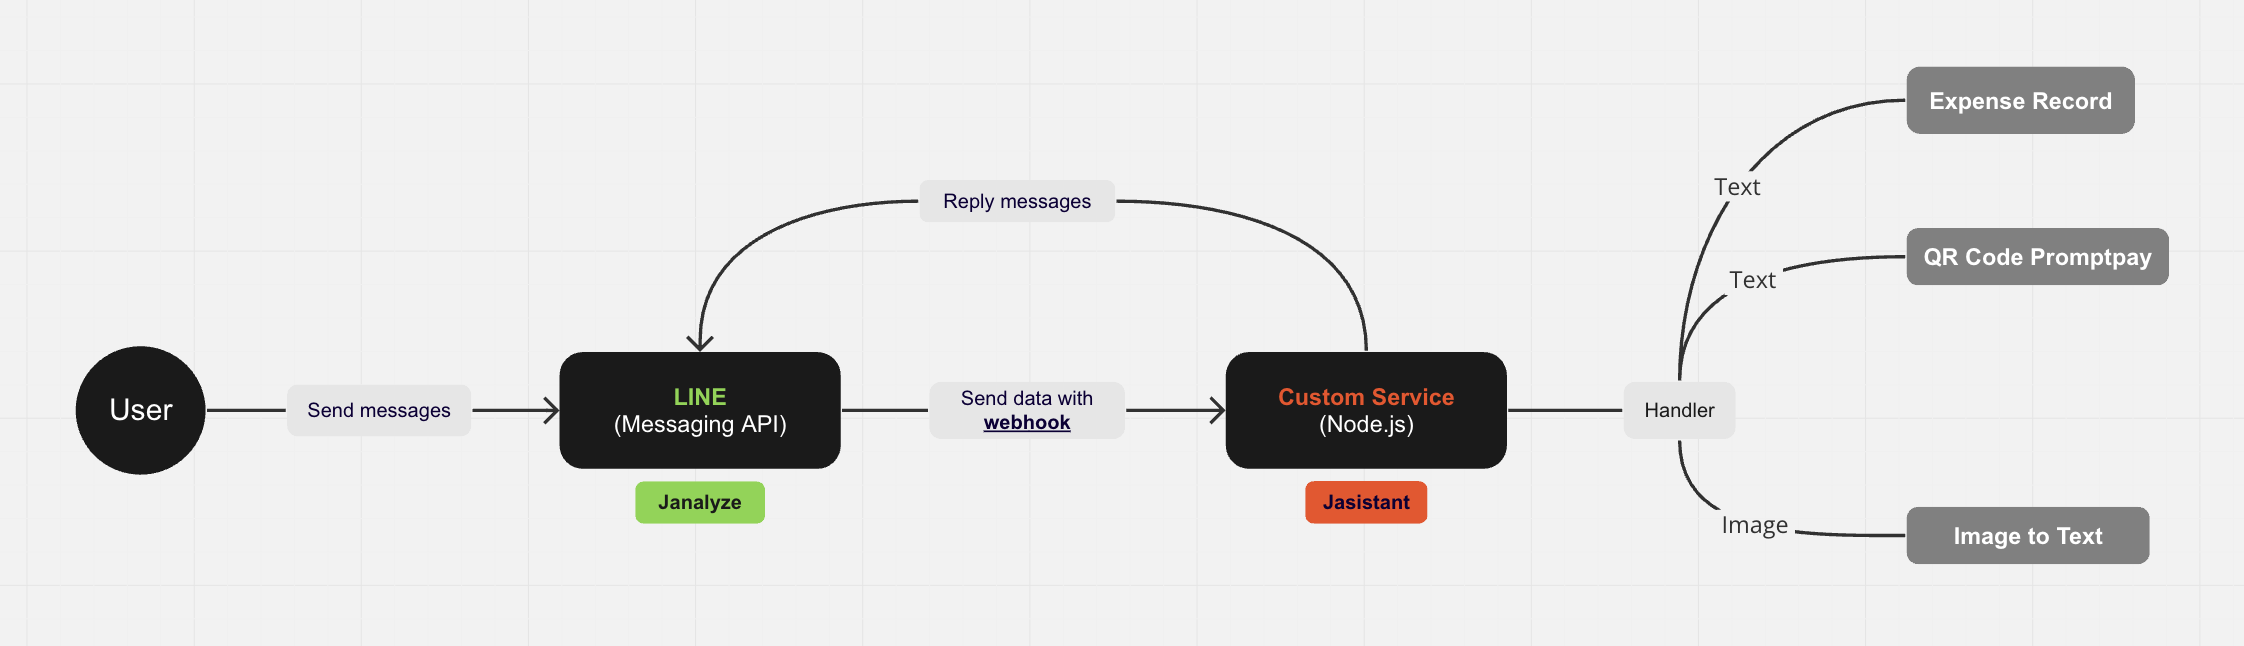
หลักๆแล้วแบ่งออกเป็น 2 Process
- LINE - เป็นส่วนที่ผมเองใช้พูดคุยกับ Bot ชื่อว่า Janalyze
- Custom Service - เป็นส่วนของการทำงานฝั่งหลังบ้านที่จะรับข้อมูลจาก LINE แล้วเอามาประมวลผลตาม Logic มีการแยกการทำงานระหว่าง Text และ Image ผมตั้งชื่อว่า Jasistant
Janalyze
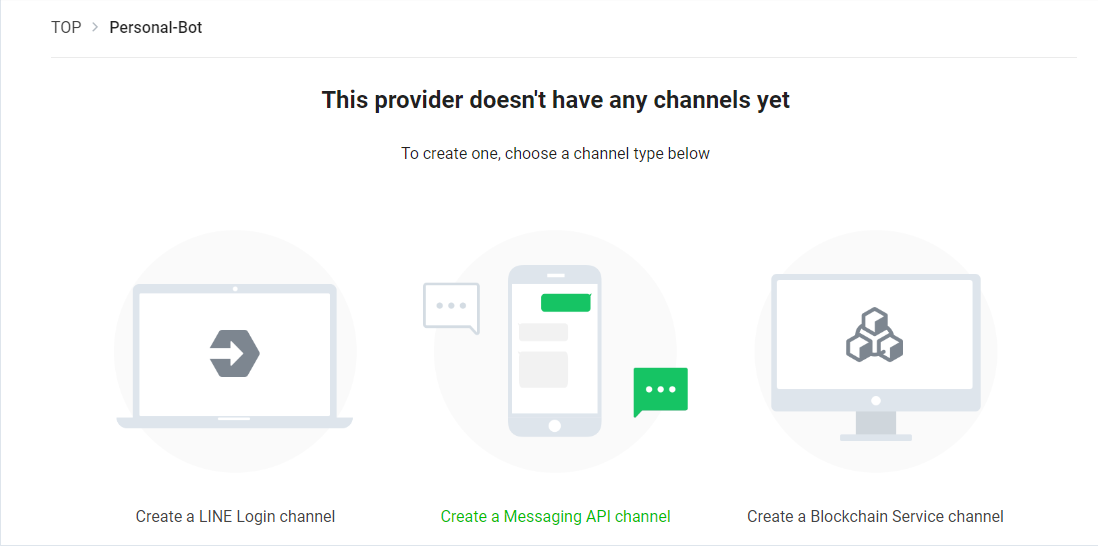
- มาสร้าง Bot กันโดยเข้าไปที่ LINE Developers แล้ว Login จะเจอกับหน้านี้

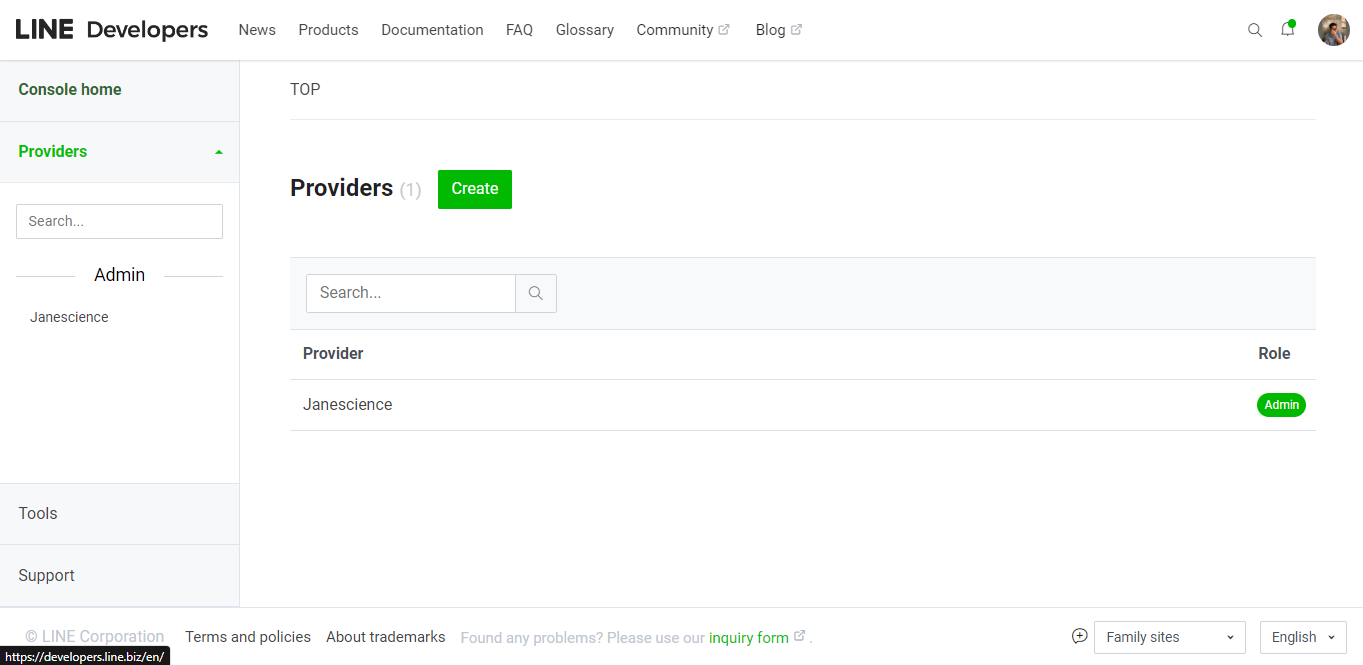
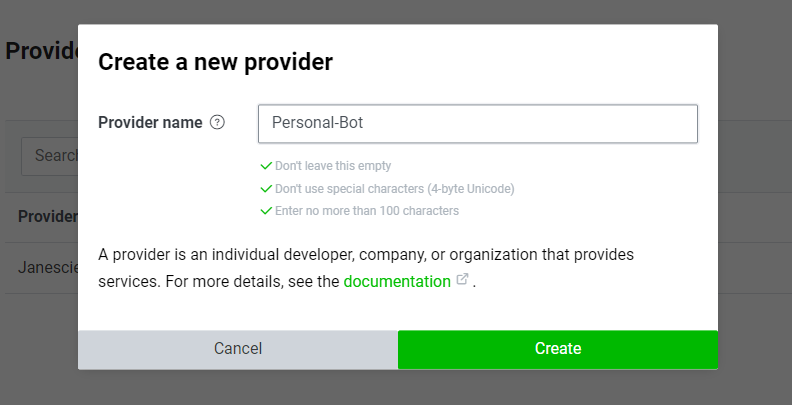
- สร้าง Providers (จากรูปข้อที่ 1 คลิก "Create") ใส่ชื่ออะไรก็ได้

- เลือก "Create a Messaging API channel"

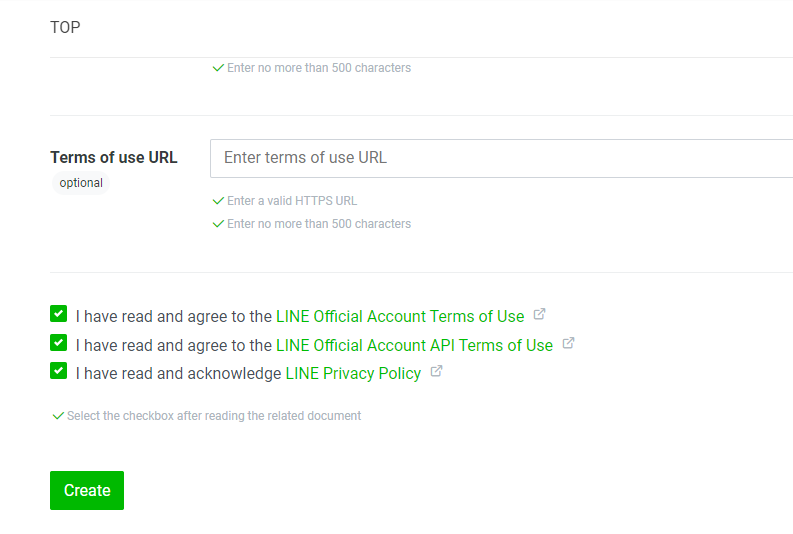
- กรอกข้อมูลต่างๆให้ครบ แล้ว "Create"

- มาที่ "Messaging API" แล้วเลื่อนลงไปที่ "Webhook settings" ทำการแก้ไข "Webhook URL" ต้องเป็น HTTPS เท่านั้น เมื่อส่งข้อความหา Bot จะมาเรียก URL ที่เรากรอกไว้

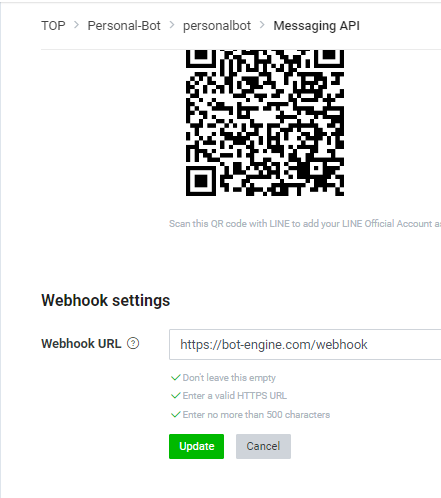
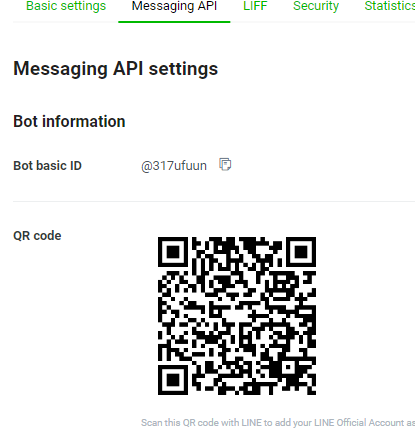
- เมื่อเสร็จหมดแล้วสามารถ Scan QR Code เพิ่มเพื่อน Bot ได้เลย เสร็จสิ้นการสร้าง Line Bot

Jasistant
ตอนเริ่มแรกผมยังไม่มี URL ที่เป็น HTTPS และผมอยากรีบทดสอบแบบเร็วๆ ผมเลยไปใช้ Glitch เป็น IDE บน Browser สามารถเอา URL ขวาบนมาใช้ได้เลย เพื่อทดสอบว่า Line Bot สามารถเชื่อมต่อกับ Service หลังบ้านได้จริงๆ แต่สำหรับเริ่มต้นเท่านั้นนะ ควรเอามาขึ้น Github แล้วหา Host ให้มันอยู่ดีๆ

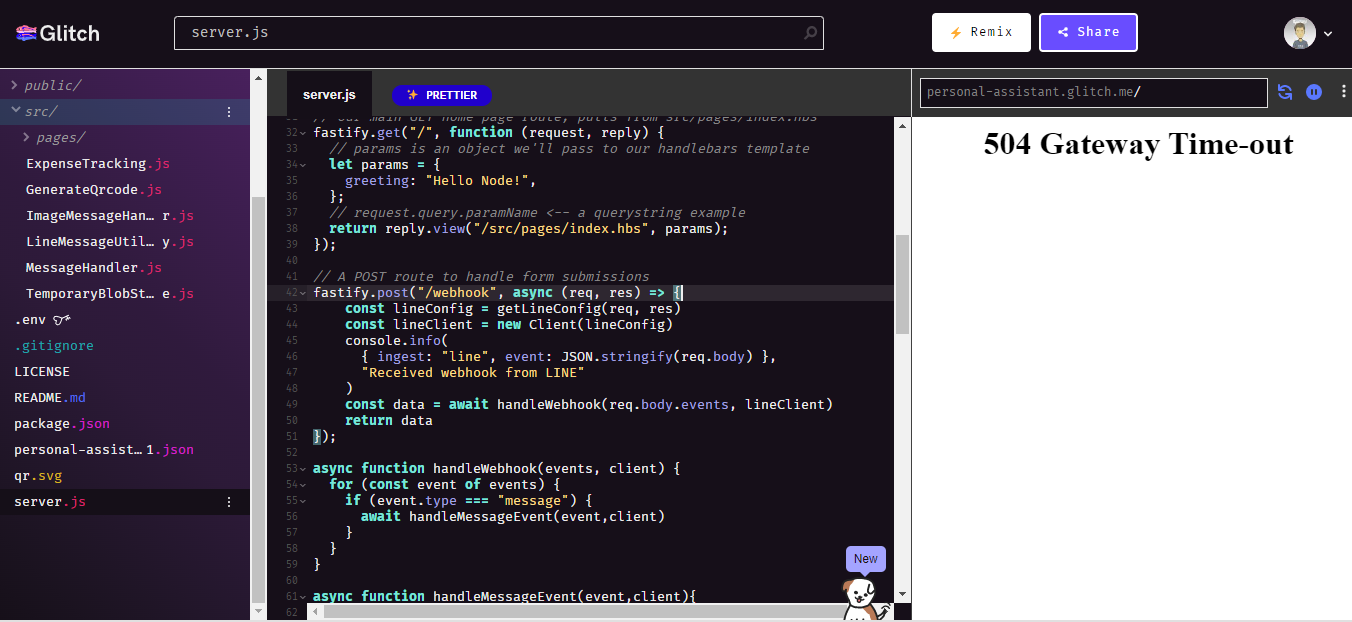
จากรูปเราแค่ใส่ Log อะไปก็ได้ใน /webhook แล้วลองส่งข้อความหา Bot
พอผมเริ่มเข้าใจและวางโครงได้แล้ว เลยมาทำเป็น Custom Service และหา Host ให้มันอยู่ โดยมี Tech Stacks ประมาณนี้
- Node.js - ใช้เป็นภาษาหลักในการทำ Backend Service
- promptpay-qr (NPM Package) - ใช้สร้าง QR Code แบบพร้อมเพย์
- tweetnacl-sealedbox-js (NPM Package) - ส่งหรือรับข้อมูลแบบเข้ารหัส
- Express.js - ใช้เป็น Framework ให้กับ Node.js
- Vercel - ใช้เป็น Hosting เพราะมันฟรีและ Custom ง่ายมาก
- Google Cloud Storage (เก็บรูปภาพ) - เมื่อเราต้องการส่งรูปภาพและให้ Bot ประมวลผลอะไรสักอย่างจะต้องมีที่เก็บรูปภาพ
- Google Cloud Vision AI (ดึงข้อความจากรูปภาพ) - เป็น AI สำหรับดึงข้อความจากรูปภาพ
- Airtable (บันทักรายจ่าย) - เป็น Database แบบง่ายๆ ที่เอาไว้เก็บข้อมมูลรายรับ รายจ่าย สามารถแก้ไขข้อมูลต่างๆผ่าน App ในมือถือได้เลยและ Export เป็น Excel ได้ด้วย ใช้งานง่ายพอสมควรแค่เข้าไปสมัครแล้วล็อคอิน สร้าง Workspace ได้เลย
Setup Google Cloud
ถ้าอยากทำแค่บันทึกรายจ่าย ไม่ต้องการสร้าง QRCode หรือ Image to Text ข้าม Step นี้ไปได้
ซึ่งเราจะต้องผูกบัตรเครดิตก่อนนะครับ เลือก START FREE ได้เลยจะขึ้นปุ่มมาข้างบน เหมือนจะมีให้ทดลองใช้ฟรี 90 วัน ใช้ได้สูงสุด 300 เครดิต(300 ดอลลาร์) หลังจากนั้นคิดราคาตามที่เราใช้ แต่ผมเองยังไม่ได้เสียเงินเลยสักบาท เพราะ Google Cloud Storage คิดราคาเป็น 1 GB/Month = $0.020 อ้างอิงจาก Google Cloud Storage Pricing และผมก็ลบรูปเสมอด้วย ก็ไม่น่าจะถึง 1 GB แน่นอน ส่วน Google Cloud Vision API สามารถใช้ได้ฟรี 1000 ภาพ/เดือน อ้างอิงจาก Google Cloud Vision API Pricing
- เข้าไปที่ Google Cloud Console ถ้ายังไม่เคยสร้าง Project ให้เลือก Create or select a project
- เมื่อมีหน้าต่าง Modal แสดงขึ้นมาให้เลือก NEW PROJECT ที่มุมขวาบนจะพามาที่หน้านี้


กรอกข้อมูลให้ครบแล้วกด CREATE รอจนสร้างเสร็จ
- เลือกโปรเจคที่เราเพิ่งสร้าง (ตรงซ้ายบนใกล้เมนูหรือตรงแจ้งเตือนก็ได้) และเลือกเมนู Cloud Storage > Buckets เพื่อสร้าง Storage ไว้เก็บรูปภาพ
- เลือก CREATE กรอกข้อมูลต่างๆให้ครบ แล้วเอาชื่อ Bucket นั้นมาใช้ในไฟล์
/utilities/storage.utility.jsจบการสร้าง Storage - ต้องสร้าง Private Key เพื่อเอาไปใช้ Auth โดยไปที่เมนู IAM & Admin > Service Accounts แล้วเลือก + CREATE SERVICE ACCOUNT
- กรอก Service account name แล้วคลิกปุ่ม CREATE AND CONTINUE
- เลือก Role เป็น Owner แล้วคลิกปุ่ม CONTINUE และ DONE ต่อได้เลย
- เสร็จแล้วเข้าไปที่ Service account details โดยคลิกตรงช่อง Email
- ไปที่ Tab KEYS เลือก ADD KEY > Create new key
- เลือก JSON แล้ว CREATE ได้เลย จะเป็นการดาวน์โหลดไฟล์ .json
- เปิดไฟล์ .json ขึ้นมาที่เราต้องใช้จะมีแค่
project_id, private_key, client_emailให้เอาค่าพวกนี้ไปใส่ในตัวแปร.env(ถ้าใช้ Vercel เป็น Host ให้เข้าไปที่ Project นั้นๆ เลือก Settings > Environment Variables)
Value ใน Environment Variables ไม่ต้องมี ""
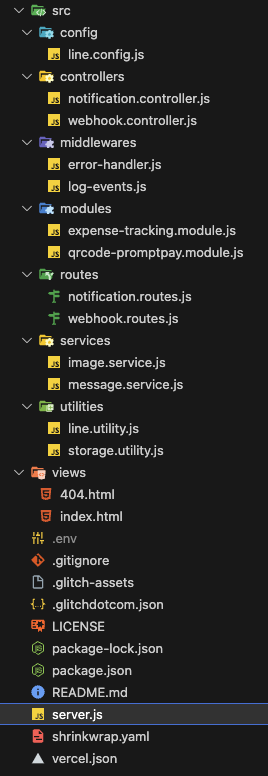
Structure

NPM Packages
{
  "name": "jasistant",
  "version": "1.0.0",
  "description": "Personal assitants for backend line bot.",
  "main": "server.js",
  "scripts": {
    "start": "node server.js"
  },
  "dependencies": {
    "@google-cloud/storage": "^6.10.0",
    "@google-cloud/vision": "^3.1.3",
    "@line/bot-sdk": "^7.5.2",
    "airtable": "^0.11.6",
    "body-parser": "^1.20.2",
    "date-fns": "^2.30.0",
    "dotenv": "^16.0.3",
    "express": "^4.18.2",
    "nanoid": "^3.3.6",
    "promptpay-qr": "^0.5.0",
    "qrcode": "^1.5.3",
    "uuid": "^9.0.0"
  },
  "engines": {
    "node": ">=14"
  },
  "repository": {
    "url": "https://github.com/Janescience/jasistant.git"
  },
  "license": "MIT",
  "keywords": [
    "node",
    "assitants",
    "line",
    "bot"
  ]
}
ติดตั้ง NPM ตาม dependencies ได้เลย
Server properties
ไฟล์นี้สำคัญมากเป็นเหมือน Application Properties สำหรับโปรเจคนี้เลย
// Import NPM
const express = require('express');
const bodyParser = require('body-parser')
const path = require("path");
const errorHandler  = require('./src/middlewares/error-handler');
const dotenv = require('dotenv');
dotenv.config();

// Initialize express app
const app = express();
app.use(express.json({limit:'50mb'}))
app.use(express.urlencoded({limit: '50mb', extended:true }))
app.use(express.static(path.join(__dirname, '/public')))
app.use(bodyParser.text())

// Routes setup
require('./src/routes/webhook.routes')(app);

// Basic route
app.get(["/","/index.html"],(req,res) => {
  res.sendFile(path.join(__dirname, 'views','index.html'));
})

// Not found route
app.all("*", (req,res) => {
  res.status(404);
  if(req.accepts('html')){
    res.sendFile(path.join(__dirname, 'views','404.html'));
  } else if (req.accepts('json')) {
    res.json({error : "404 Not Found"});
  }else {
    res.type('txt').send('404 Not Found')
  }
})

//Error handler
app.use(errorHandler)

//App started
app.listen(process.env.PORT, () => {
  console.log("Server is running on port : ",process.env.PORT);
})
อธิบายเพิ่มเติมตาม Comment
Import NPM - เป็นส่วนที่บอกว่า Code หน้านี้เราจะใช้ NPM อะไรบ้าง ก็ให้ Import เข้ามาและเราต้อง Install ผ่าน
npmก่อนด้วยnpm i express body-parser dotenvInitialize Express App - เรียกใช้เฟรมเวิร์ค Express และตั้งค่าต่างๆ ไม่ว่าจะเป็น Limit การรับส่งข้อมูล หรือ Path ของ Static file
Routes Setup - บอกว่า App มี Routes อะไรบ้าง โดยในไฟล์จะเป็นการกำหนด HTTP Method แยก Path ตามไฟล์ เมื่อเรียก URL มาที่
/webhookจะวิ่งเข้าwebhook.controllerwebhook.routes.jsconst controller = require("../controllers/webhook.controller"); const { logger } = require("../middlewares/log-events"); module.exports = function(app) { app.use(function(req, res, next) { res.header( "Access-Control-Allow-Headers", "x-access-token, Origin, Content-Type, Accept" ); next(); }); app.post('/webhook',[logger],controller.webhook); };Basic Route - กำหนด Default Path ถ้าเข้าด้วย URL
/หรือ/index.htmlจะให้ทำอะไรบ้างหรือ Redirect ไปไฟล์ไหนindex.html<div id="main"> <div class="fof"> <h1>Welcome Jasistant Engine</h1> </div> </div>Not Found Route - กำหนดว่าถ้ามีการเข้า URL อะไรก็ตามที่ไม่มีอยู่ใน App จะให้แสดงเป็นอะไร ของผมให้แสดงหน้า
404.html404.html<div id="main"> <div class="fof"> <h1>Error 404</h1> </div> </div>Error Handler - เมื่อมี Error จะให้ทำตาม Process ในไฟล์
/src/middlewares/error-handlererror-handler.jsconst { logEvents } = require('./log-events'); const errorHandler = (err,req,res,next) => { logEvents(`${err.name} : ${err.message}`); res.status(500).send(err); } module.exports = errorHandler;- errorHandler - ทุกครั้งที่เกิด Error จะให้แสดง Log ออกมาผ่าน
logEventและ Return กลับไปด้วย Error code = 500 เสมอ
log-event.jsconst { format } = require('date-fns'); const { v4:uuid } = require('uuid'); const logEvents = async (message) => { const dateTime = `${format(new Date(),'yyyyMMdd\tHH:mm:ss')}`; const logItem = `${dateTime}\t${uuid()}\t${message}\n`; console.log(logItem) } const logger = (req,res,next) => { if(req.body){ console.log(`${req.method} ${req.path} ${JSON.stringify(req.body)}`); }else{ console.log(`${req.method} ${req.path}`); } next(); } module.exports = { logger , logEvents};- logEvents - ที่เราทำแบบนี้เพื่อกำหนด Format ของ Log และเลือกได้จะเรียกใช้ตรงไหน
- logger - สำหรับเอาไว้ Log ทุกครั้งที่มีการ Request เข้ามา และเราเลือกจะใส่หรือไม่ใส่ก็ได้แต่ล่ะ Path ในไฟล์
.routes.js
- errorHandler - ทุกครั้งที่เกิด Error จะให้แสดง Log ออกมาผ่าน
App Started - กำหนดได้ว่าให้ Running ที่ PORT อะไร ผมกำหนดไว้ใน
process.env.PORTและในฟังก์ชันlistenกำหนดได้ว่าให้ทำอะไรบ้างตอน Start project ผมให้แสดง Log ออกมาว่า Run ที่ PORT อะไร.envPORT=3000
Config
const dotenv = require('dotenv');
dotenv.config();

const config = () => {
    return {
        channelAccessToken: process.env.LINE_CHANNEL_ACCESS_TOKEN,
        channelSecret: process.env.LINE_CHANNEL_SECRET
    }
}

module.exports = config
- ใช้
dotenvเพื่อให้เข้าถึงตัวแปรในไฟล์.envได้ - LINE_CHANNEL_ACCESS_TOKEN เอาค่ามาจาก Messaging API แล้วเลื่อนไปข้างล่างสุดดูที่หัวข้อ Channel access token
- LINE_CHANNEL_SECRET เอาค่ามาจาก Basic settings แล้วไปที่หัวข้อ Channel secret
Utilities
Line
const toMessages = (data) => {
  if (!data) data = "Data reply is undefined..."
  if (typeof data === "string") data = [{ type: "text", text: data }]
  return data
}

const createBubble = (
  title,
  text,
  {
    headerBackground = "#353433",
    headerColor = "#d7fc70",
    textSize = "xl",
    altText = String(text),
    footer
  } = {}
) => {
  const data = {
    type: "bubble",
    styles: {
      header: { backgroundColor: headerBackground }
    },
    header: {
      type: "box",
      layout: "vertical",
      contents: [
        { type: "text", text: title, color: headerColor, weight: "bold" }
      ]
    },
    body:
      typeof text === "string"
        ? {
            type: "box",
            layout: "vertical",
            contents: [{ type: "text", text: text, wrap: true, size: textSize }]
          }
        : text
  }
  if (footer) {
    data.styles.footer = { backgroundColor: "#e9e8e7" }
    data.footer =
      typeof footer === "string"
        ? {
            type: "box",
            layout: "vertical",
            contents: [
              {
                type: "text",
                text: footer,
                wrap: true,
                size: "sm",
                color: "#8b8685"
              }
            ]
          }
        : footer
  }
  return {
    type: "flex",
    altText: truncate(`[${title}] ${altText}`, 400),
    contents: data
  }
}

const  truncate = (text, maxLength) => {
  return text.length + 5 > maxLength
    ? text.substr(0, maxLength - 5) + "…"
    : text
}

const readAsBuffer = (stream) => {
  return new Promise((resolve, reject) => {
    stream.on("error", e => {
      reject(e)
    })
    const bufs = []
    stream.on("end", () => {
      resolve(Buffer.concat(bufs))
    })
    stream.on("data", buf => {
      bufs.push(buf)
    })
  })
}

const utility = {
  toMessages,
  createBubble,
  readAsBuffer
};

module.exports = utility;
- toMessage - ใช้สำหรับส่งค่ากลับไปใน Line(Bot ตอบเรา) แบบเป็นข้อความธรรมดา โดยมีการตรวจสอบด้วยว่าจะต้องเป็น String เท่านั้น
- createBubble - เป็นการตอบกลับแบบ Flex Message ที่จะไม่ใช่ข้อความธรรมดา อาจจะมีรูปหรือปุ่มให้กดได้ จัดแบบฟอร์มและตำแหน่งข้อความตามต้องการ โดยของผมจะสร้าง Layout ไว้หมดแล้วและรับเอาแค่บางตัวแปร อ่านเพิ่มเติมได้ที่ Flex Message
- truncate - ในกรณีที่ข้อความยาวเกินที่กำหนดจะให้แสดงเป็น ...
- readAsBuffer - ใช้สำหรับรูปภาพเปลี่ยน Content เป็น Buffer เพื่อนำไปส่งเข้า Cloud อีกที
Storage
const { Storage } = require("@google-cloud/storage")
const { nanoid } = require("nanoid")

const storage = new Storage(
  {
    projectId: process.env.GCS_PROJECT_ID,
    scopes: 'https://www.googleapis.com/auth/cloud-platform',
    credentials: {
      client_email: process.env.GCS_EMAIL,
      private_key: process.env.GCS_PRIVATE_KEY
    }
  }
);

const putBlob = async (buffer, extension) => {
  const blobName = nanoid() + extension
  await storage
    .bucket("tmpblobimg")
    .file(blobName)
    .save(buffer)
  return blobName
}

const getBlob = async (blobName) => {
  const response = await storage
    .bucket("tmpblobimg")
    .file(blobName)
    .download()
  return response[0]
}

const deleteBlob = async (blobName) => {
  await storage
    .bucket("tmpblobimg")
    .file(blobName)
    .delete();
}

const getBlobUrl = async (blobName) => {
  const result = await storage
    .bucket("tmpblobimg")
    .file(blobName)
    .getSignedUrl({
      action: "read",
      expires: new Date(Date.now() + 86400e3),
      version: "v4",
      virtualHostedStyle: true
    })
  return result[0]
}

const cloudStorage = {
  putBlob,
  getBlob,
  deleteBlob,
  getBlobUrl
};

module.exports = cloudStorage;
อยากแอบกระซิบเลยว่ากว่าผมจะเข้าใจและใช้ Google Cloud เป็นก็ใช้เวลางมอยู่สักพักเลย โดยเฉพาะเรื่องรูป
- storage - เป็นการ Authorization storage ใน Cloud ด้วยการใช้ Project ID , Email และ Private Key
- putBlob - เป็นการเซฟรูปเข้าไปที่ Cloud Storage ซึ่งผมติดปัญหาอยู่ว่าไม่สามารถสร้าง Bucket ได้ผ่าน Code (ติดเรื่อง Permission) ผมเลยต้องไปสร้าง Bucket ที่ชื่อว่า tmpblobimg ไว้รอก่อนใน Cloud Storage
- getBlob - เป็นเหมือนการดึงรูปภาพหรือดาวน์โหลดรูปภาพจาก Cloud Storage
- deleteBlob - ลบรูปภาพจาก Cloud Storage
- getBlobUrl - ดึง URL ของรูปภาพเพื่อ Preview (ใช้ส่งกลับไปใน LINE Message ผ่าน Flex Message)
Modules
Expense Tracking
const Airtable = require("airtable");
const { AirtableRecord } = require("airtable");
const { createBubble } = require("../utilities/line.utility");

const expenseTable = () => {
  return new Airtable({ apiKey: process.env.AIRTABLE_API_KEY })
    .base(process.env.AIRTABLE_EXPENSE_BASE)
    .table("Expense Records");
};

const expenseTracking = async (time,name,amount, category) => {
  const date = time ? time : new Date();
  // Airtable
  const recorded = await expenseTable().create(
    {
      Name: name.trim(),
      Date: date,
      Category: category,
      Amount: amount,
    },
    { typecast: true }
  );
  const body = {
    type: "box",
    layout: "vertical",
    contents: [
      {
        type: "text",
        text: "฿" + amount,
        size: "xxl",
        weight: "bold",
      },
      {
        type: "text",
        text: `${category}${name ? "\n" + name.trim() : ""}`,
        wrap: true,
      },
    ],
    action: {
      type: "uri",
      label: "Open Airtable",
      uri: process.env.AIRTABLE_EXPENSE_URI + "/" + recorded.getId(),
    },
  };
  const footer = await summary();
  const bubble = createBubble("Expense Tracking", body, {
    headerColor: "#f7f7f2",
    footer: {
      type: "box",
      layout: "horizontal",
      spacing: "sm",
      contents: footer.map(([label, text]) => ({
        type: "box",
        layout: "vertical",
        contents: [
          {
            type: "text",
            text: label,
            color: "#8b8685",
            size: "xs",
            align: "end",
          },
          {
            type: "text",
            text: text,
            color: "#8b8685",
            size: "sm",
            align: "end",
          },
        ],
      })),
      action: {
        type: "uri",
        label: "Open Airtable",
        uri: process.env.AIRTABLE_EXPENSE_URI,
      },
    },
  });
  return {message:bubble};
};

const summary = async () => {
  const date = new Date().toJSON().split("T")[0];
  const tableData = await expenseTable().select().all();
  const normalRecords = tableData.filter((r) => !r.get("Occasional"));
  const records = AirtableRecord;
  const total = (records) => records.map((r) => +r.get("Amount") || 0).reduce((a, b) => a + b, 0);
  const firstDate = normalRecords
    .map((r) => (r.get("Date") ? r.get("Date").split("T")[0] : r.get("Date")))
    .reduce((a, b) => (a < b ? a : b), date);

  const todayUsage = total(
    normalRecords.filter(
      (r) => (r.get("Date") ? r.get("Date").split("T")[0] : r.get("Date")) === date
    )
  );
  const dayNumber = Math.round((Date.parse(date) - Date.parse(firstDate)) / 86400e3) + 1;
  const $ = (v) => `฿${v.toFixed(2)}`;

  return [
    ["Today", $(todayUsage)], //รายจ่ายรวมทั้งหมดของวันนี้
    ["Day", `${dayNumber}`], //รวมแล้วมีการบันทึกรายจ่ายทั้งหมดกี่วัน
  ];
};

module.exports = expenseTracking;
- expenseTable - เป็นการบอกว่าเราใช้ Airtable อันไหนและ Table ชื่อว่าอะไร เชื่อมต่อด้วย APIKEY และ BASE ID ส่วนตรงชื่อ Table ถ้าเรายังไม่ได้สร้าง มันก็จะสร้างให้อัตโนมัติ
- AIRTABLE_API_KEY (APIKEY) - เข้าไปดูข้อมูลที่ APIKEY
- AIRTABLE_EXPENSE_BASE (BASE ID) - เป็น Base ID เพื่อบอกว่าเราต่อกับ Base อันไหน ให้ดูจาก URL โดยเอาค่ามาจาก หลัง
.com/เช่น https://airtable.com/app1brOBAd2BLsotU/tbltpKT3ZVDRoo8zG/viwvm85L6NKZcvifX?blocks=hide ก็ให้เอาค่า app1brOBAd2BLsotU มาใช้
- expenseTracking - เตรียม Flex Message ไม่ว่าจะเป็น body, footer, action
- summary - เป็นการคำนวณรายจ่ายรวมของแต่ล่ะวัน และคำนวณว่าเราบันทึกรายจ่ายมาแล้วกี่วัน
QRCode Promptpay
const qrcode = require('qrcode')
const generatePayload = require('promptpay-qr')
const { putBlob,getBlobUrl } = require('../utilities/storage.utility')

const generateQrcode = async (amount) => {

  const mobileNumber = '080-608-XXXX'
  const payload = generatePayload(mobileNumber, { amount })

  const bufferImage = await qrcode.toBuffer(payload, {
      type: 'jpg',
      errorCorrectionLevel: 'H',
  });

  const blobName = await putBlob(bufferImage, ".jpg")
  const blobUrl = await getBlobUrl(blobName)

  const message =
  [
    {
      type: 'image',
      originalContentUrl: blobUrl,
      previewImageUrl: blobUrl
    },
    {
      type: "text",
      text: `${amount} บาท`,
    }
  ]

  return {
      message: message,
      blobName : blobName
    }
}

module.exports = generateQrcode;
- qrcode (NPM Packages) - สำหรับแปลง Payload เป็นรูป QRCode
- promptpay-qr (NPM Packages) - สำหรับสร้าง Payload ที่เอาไว้สร้าง QRCode จากเบอร์โทรศัพท์และจำนวนเงิน
- generateQrcode - สร้าง QRCode และแปลงเป็น Buffer Image เพื่อส่งไปเก็บไว้ใน Cloud Storage และดึง URL ของรูปภาพนั้นออกมา ส่งกลับไปหา LINE ผ่าน Flex Message โดยแสดงด้วยว่าเป็นจำนวนเงินเท่าไหร่
แต่ติดปัญหาอยู่ว่า LINE API ที่ใช้ตอบกลับ กำหนดให้ไม่เกิน 1000 ตัวอักษร แต่ blobUrl ที่ได้มามันยาวมาก และยังต้องส่งไปทั้ง originalContentUrl และ previewImageUrl ทำให้ไม่สามารถส่งได้ ถ้าจะส่งเป็น Flex Message
Services
Message
สำหรับ Filter ข้อความเพื่อแยกการทำงานตาม Module ด้วยการใช้ .match
const expenseTracking = require("../modules/expense-tracking.module")
const qrcodePromptpay = require("../modules/qrcode-promptpay.module")

const category = {
  t: "transportation",
  f: "food",
  e: "electronic",
  d: "drinks",
  c: "clothes",
  a: "alcohal",
  g: "game",
  h: "health",
  m: "miscellaneous",
  o: "occasion",
  l: "lodging"
}

const messageService = async (message) =>{
    message = message.trim()
    let match
    if (match = message.match(/^([\d.]+|[ivxlcdm]+)([tfedcaghmol])([ \w]+|)$/i)) {//บันทึกรายจ่าย

      const m = match

      const enteredAmount = +m[1]
      const amount = enteredAmount.toFixed(2)
      const ctg = category[m[2].toLowerCase()]
      const name = m[3] ? m[3] : ""

      return await expenseTracking(null,name,amount, ctg)
    }else if(match = message.match(/^(expctg)$/i)){//ขอดู Category
      return {message :  JSON.stringify(category,null,4) }
    }else if(match = message.match(/^(qr)([\d.]+)$/i)){//สร้าง QRCode
      const m = match
      const amount = Number(match[2])
      return await qrcodePromptpay(amount)
    }
}

module.exports = messageService;
- category - เก็บ List ของ Category
- messageService - รับข้อความมาแล้วเช็คเงื่อนไขดังนี้
- บันทึกรายจ่าย - จะเข้าเงื่อนไขนี้เฉพาะข้อความ 60d , 120d starbuck หรือ 55.86f
- ขอดู Category - จะเข้าเงื่อนไขนี้เฉพาะข้อความ expctg
- สร้าง QRCode - จะเข้าเงื่อนไขนี้เฉพาะข้อความ qr แล้วตามด้วยจำนวนเงิน เช่น qr100
Image
สำหรับดึงข้อความจากรูปภาพ (Image to Text)
const vision = require('@google-cloud/vision')
const { getBlob,putBlob } =  require('../utilities/storage.utility')

const imageService = async (buffer) => {

    //Upload image to google cloud storage(buckets)
    const blobName = await putBlob(buffer, ".jpg")

    const blob = await getBlob(blobName)

    const imageAnnotator = new vision.ImageAnnotatorClient(
        {
            projectId: process.env.GCS_PROJECT_ID,
            scopes: 'https://www.googleapis.com/auth/cloud-platform',
            credentials: {
              client_email: process.env.GCS_EMAIL,
              private_key: process.env.GCS_PRIVATE_KEY
            }
        }
    );
    const results = await imageAnnotator.documentTextDetection(blob)
    const fullTextAnnotation = results[0].fullTextAnnotation

    let blocks = []

    for (const page of fullTextAnnotation.pages) {
        blocks.push(
            ...page.blocks.map((block) => {
            return block.paragraphs
                .map((p) =>
                p.words
                    .map((w) => w.symbols.map((s) => s.text).join(''))
                    .join(' ')
                )
                .join('\n\n')
            })
        )
    }

    const responses = blocksToResponses(blocks)
    return {message:responses.map((r) => ({ type: 'text', text: r })),blobName:blobName}
}

const blocksToResponses = (blocks) => {

    if (blocks.length <= 4) return blocks

    let processedIndex = 0
    const outBlocks = []

    for (let i = 0; i < 4; i++) {
      const targetIndex = Math.ceil(((i + 1) * blocks.length) / 4)
      outBlocks.push(
        blocks
          .slice(processedIndex, targetIndex)
          .map((x) => `・ ${x}`)
          .join('\n')
      )
      processedIndex = targetIndex
    }

    return outBlocks
}

module.exports = imageService;
- imageService - มีการทำงานดังนี้
- บันทึกรูปภาพไปที่ Cloud Storage โดยใช้
putBlob - ดึงรูปภาพจาก Cloud Storage โดยใช้
getBlobส่งblobNameเข้าไป - Aurthorize
google-cloud/visionด้วย Project ID , Email และ Private Key - โยน
blobเข้าไปใน Function.documentTextDetectionเพื่อประมวลผลดึงข้อความจากรูปภาพ และเลือกได้ เราจะเอาข้อมูลอะไรจากการประมวลผล เราเลือกfullTextAnnotation - เอาข้อความทั้งหมดมาแยกและเรียงออกตาม Paragraphs โดยอ่านวน Loop ไปทีล่ะ Page
- เมื่อเรียงข้อความและจับใส่ตัวแปรที่เป็น List แล้ว ถ้าข้อความไม่ได้ยาวเกินที่กำหนดก็จะ Response กลับไปทันที แต่เมื่อไหร่ที่เป็นข้อความที่ยาวมากๆ จะต้องมีการแบ่งเพื่อให้แต่ล่ะรอบไม่เกิน 1000 ตัวอักษร
- บันทึกรูปภาพไปที่ Cloud Storage โดยใช้
Controller
Webhook
const config = require("../config/line.config");
const messageService = require("../services/message.service");
const imageService = require("../services/image.service");

const { Client } =  require('@line/bot-sdk')
const { toMessages,readAsBuffer } = require('../utilities/line.utility')
const { deleteBlob } = require('../utilities/storage.utility')

exports.webhook = async (req, res) => {
    const client = new Client(config())
    const events = req.body.events;
    return await handleWebhook(events, client)
};

const handleWebhook = async (events, client) => {
  for (const event of events) {
    if (event.type === "message") {
      await messageEvent(event,client)
    }
  }
}

const messageEvent = async (event,client) => {
    const { replyToken, message } = event
    try {
        //Validate
        if(event.source.userId !== process.env.LINE_USER_ID){
            await client.replyMessage(replyToken,toMessages('unauthorized'))
            return
        }

        if (message.type === 'text') { //Text
            const reply = await messageService(message.text)
            await client.replyMessage(replyToken,toMessages(reply.message))
            if(reply.blobName){
                setTimeout(() => {
                    deleteBlob(reply.blobName);
                }, 3000);
            }
        }else if (message.type === 'image') { //Image
            const content = await client.getMessageContent(message.id)
            const buffer = await readAsBuffer(content)
            const reply = await imageService(buffer)
            await client.replyMessage(replyToken, toMessages(reply.message))
            if(reply.blobName){
                setTimeout(() => {
                    deleteBlob(reply.blobName);
                }, 3000);
            }
        }
    } catch (error) {
        await client.replyMessage(replyToken,toMessages(error))
    }
}
อธิบายเพิ่มเติมตาม Comments
- Validate - เพื่อเป็นการป้องกันไม่ให้ใครก็ได้มาใช้ Service ของเรา ต้องมีการตรวจสอบ LINE_USER_ID
- Text - เมื่อส่งเป็นข้อความหา LINE Bot ก็จะเข้า
messageServiceประมวลผลต่อไป และถ้าเป็นการสร้าง QRCode เมื่อทุกอย่างเสร็จหมดแล้วผมให้มันลบรูปที่อยู่บน Cloud Storage ด้วย เพราะจะได้ไม่เปลืองพื้นที่และรูปก็ไม่ได้ใช้อีกแล้ว - Image - เมื่อส่งรูปภาพหา LINE Bot ก็จะเข้า
imageServiceประมวลผลต่อไป และเหมือนกันเมื่อทุกอย่างเสร็จเราก็จะลบรูปทิ้ง
การลบรูปไม่ควรใช้
setTimeoutควรจะเก็บเป็น List ไว้แล้วตั้ง Job Schedule ลบรอบเดียวในแต่ล่ะวัน เพื่อง่ายต่อการติดตามและจัดการเมื่อเกิดปัญหา และถ้ามีการใช้งานเยอะๆ การใช้setTimeoutอาจจะมีผลต่อ Performance แต่ที่ผมทำแบบนี้เพราะผมใช้อยู่คนเดียว เน้นความง่ายไว้ก่อน
การใช้งาน
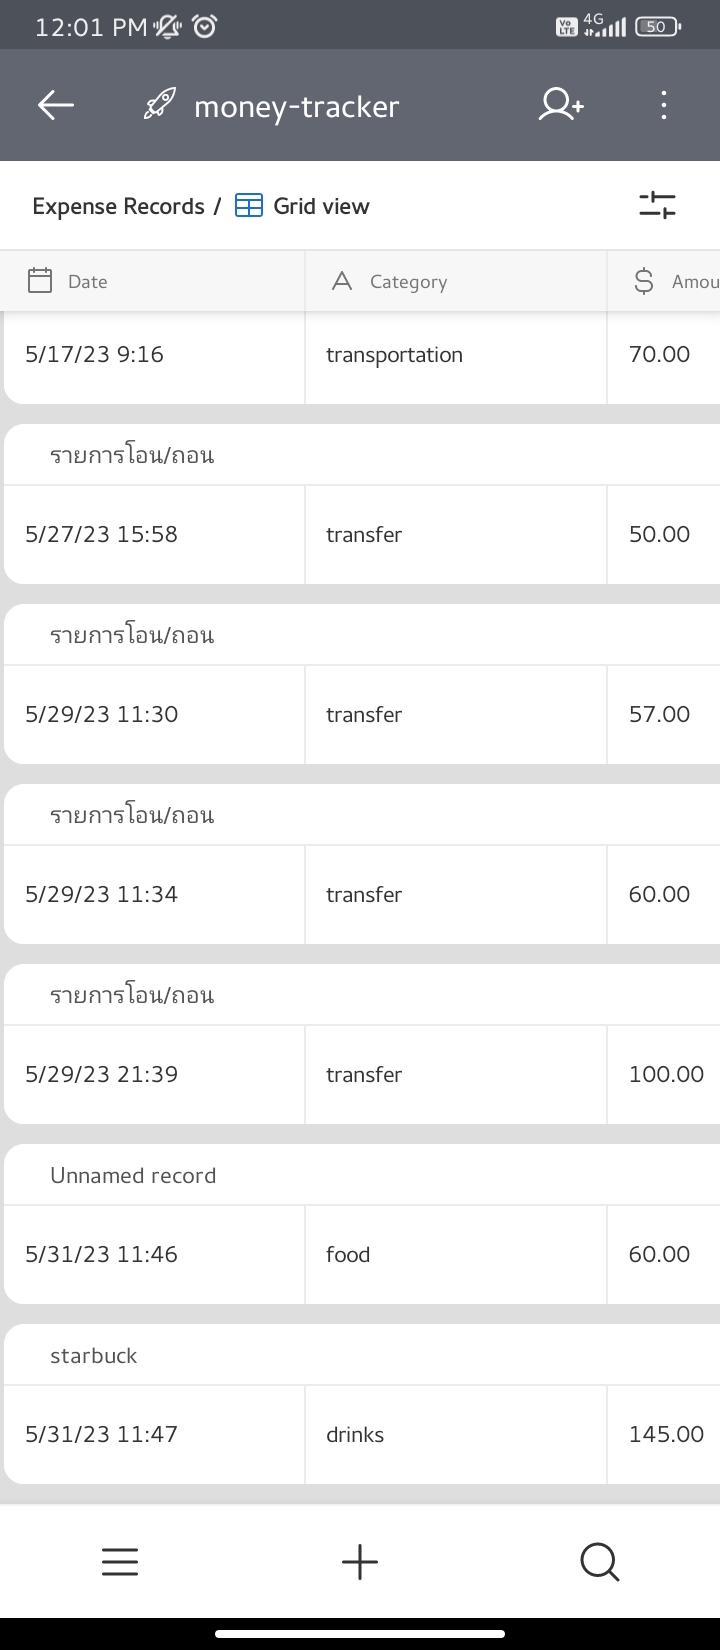
- Expense Record - แน่นอนว่าทุกวันนี้มีแอปบันทึกรายรับ-รายจ่ายเต็มไปหมด แต่การบันทึกแต่ล่ะรายการนั้น ต้องทำอย่างน้อย 2-3 step และมีหลายอย่างที่ต้องกรอก แต่ Line Bot ที่ทำขึ้นมานี้ ก็เพื่อให้ง่ายที่สุด ลดขั้นตอนที่ไม่ต้องการ ด้วยการพิมพ์สั้นๆ เช่น พิมพ์ว่า "60f" เป็นการบอกว่า จ่ายค่าอาหารไป 60 บาทนะ(f ย่อมาจาก food ที่แปลว่าอาหาร) หรืออยากจะบอกเพิ่มเติมว่า อาหารที่กินคืออะไร ก็พิมพ์ได้ว่า "60f noodle" และ Bot จะตอบกลับมาโดยสามารถคลิกเข้าไปแก้ไขข้อมูลได้ผ่าน Airtable
| คำสั่ง "60f" | คำสั่ง "145d startbuck" |
|---|---|
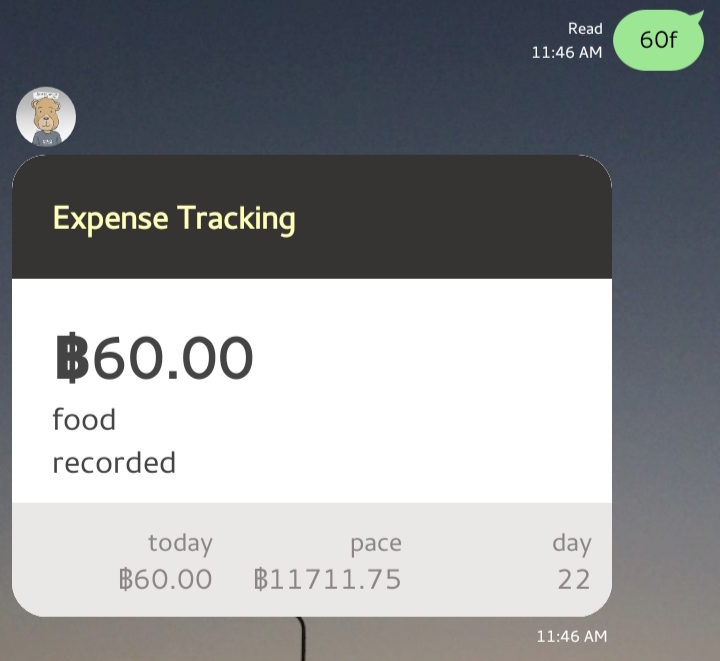 | 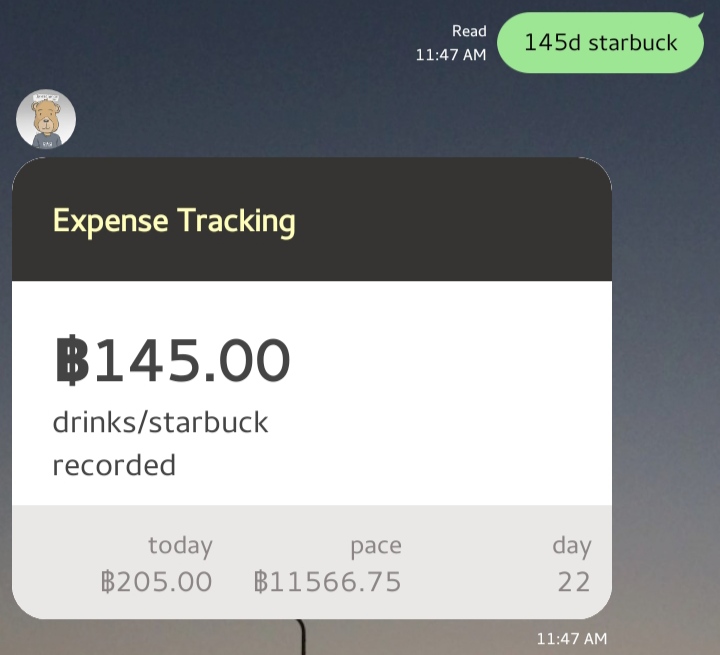 |
| Airtable(Rows) | Airtable(Detail) |
|---|---|
 | 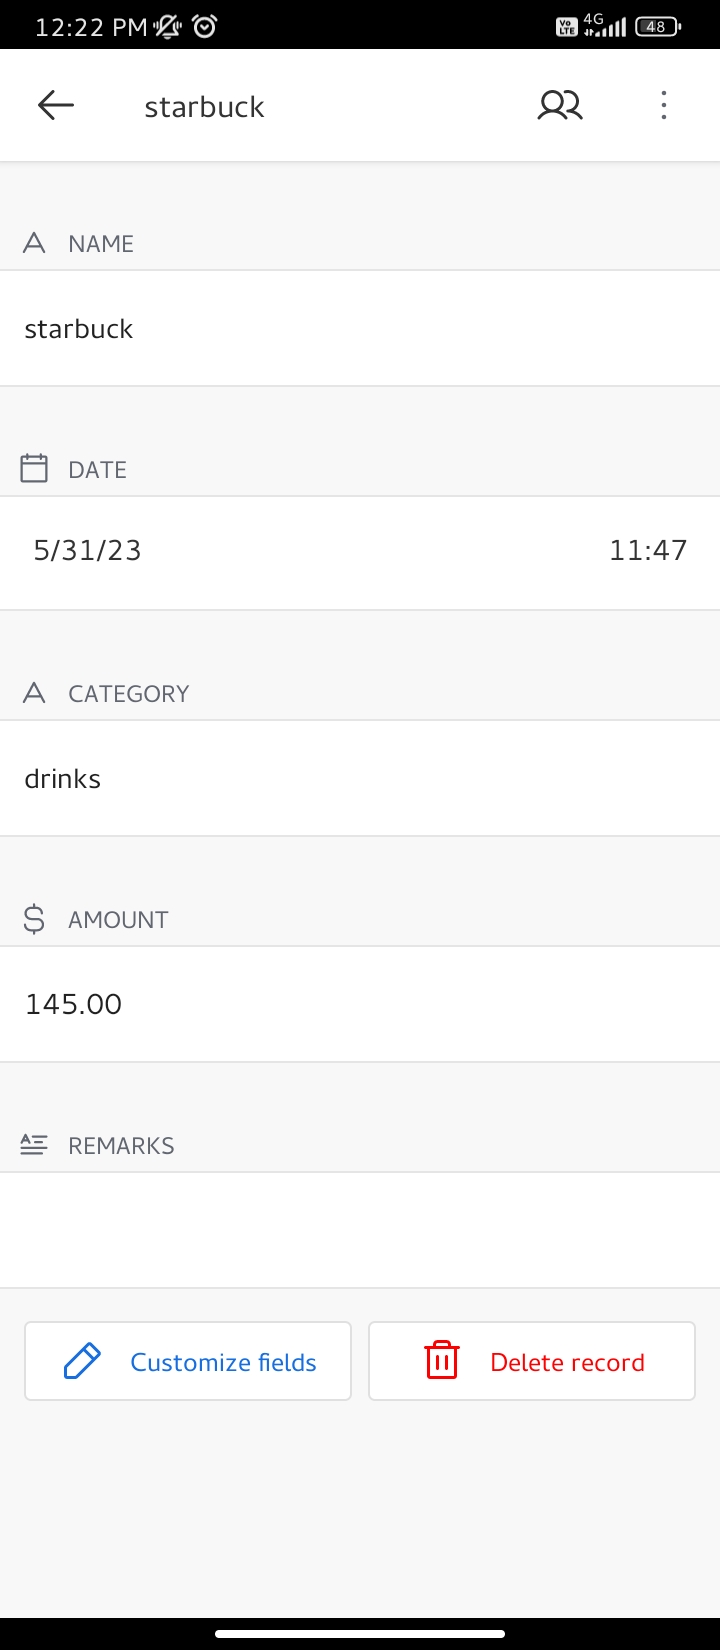 |
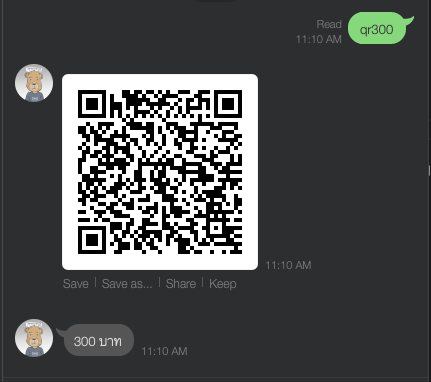
- QR Code Promptpay - ทำได้ง่ายๆ ถ้าอยากได้ QR ที่เป็น 100 บาท ก็พิมพ์ว่า "qr100" ก็จะได้ QR Code ที่ล็อคจำนวนเงินไว้ให้เลย (ลอง Scan ดูได้) การทำงานคร่าวๆ คือสร้าง QR Code เป็น Buffer แล้ว Upload ขึ้น Google Cloud Storage ส่งค่ากลับมาเป็น Url และ Reply กลับมาผ่าน Line แสดงเป็นรูปภาพ

- Image to Text - ส่งรูปภาพอะไรไปก็ได้ แล้ว Bot จะตอบกลับมาเป็นข้อความทั้งหมดที่อยู่ในรูปภาพ ความแม่นยำและถูกต้องขึ้นอยู่กับความคมชัดของข้อความในรูปภาพ แต่ถ้าเป็นภาษาไทยประโยคที่ได้จะเว้นเป็นคำๆ ไม่ติดกัน ซึ่งผมก็ไม่ทราบว่าเพราะอะไร เพราะการดึงข้อความตรงนี้เราใช้ Google Cloud Vision AI

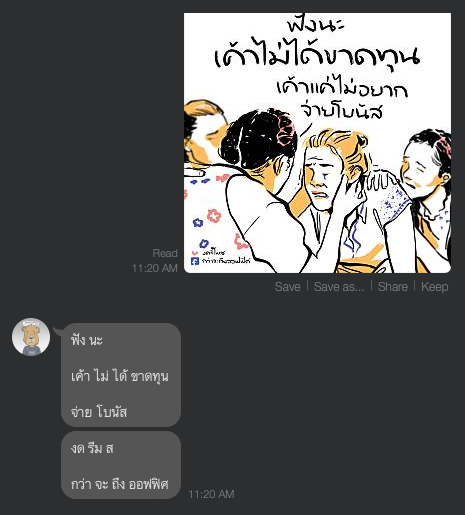
ซึ่งถ้าเขียนด้วยลายมือ Bot อาจจะอ่านไม่ออกบางคำ จะเห็นตกคำว่า "เค้าแค่ไม่อยาก" และคำว่า "งดรีโพส" ได้มาเป็น "งด รีม ส"

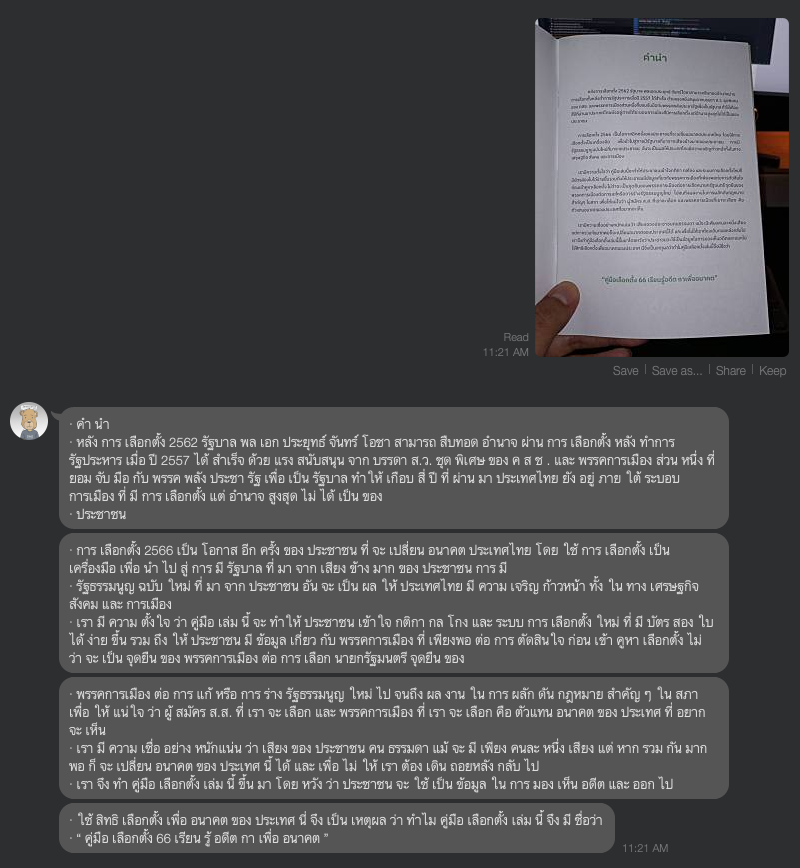
แต่ถ้าเป็นตัวอักษรที่พิมพ์เอาและถ่ายให้ชัดเจน ค่อนข้างจะถูกต้อง 100% นอกจากตัวอักษรนั้นจะเล็กมากๆ