

- Published on
สร้าง Comments ให้กับ Website ด้วย Giscus


ผมที่เริ่มเขียน Blog ได้ไปอ่านบทความของ devahoy.com เป็นการแชร์วิธีเพิ่ม Comments ให้กับ Website ด้วย Giscus และเห็นว่าเป็น open source ที่ไม่มี ads ด้วย เลยอยากจะลองเอามาใส่ที่เว็บของตัวเองบ้าง ซึ่งผมได้นำ Giscus มาใช้ตั้งนานแล้ว แต่เพิ่งจะมีเวลามาเขียน Blog ครับ
ตั้งค่าและติดตั้ง Giscus
การจะใช้งาน Giscus มีเงื่อนไขและต้องตั้งค่าอยู่เล็กน้อย
ตรวจสอบเงื่อนไขของ Repo
- Repository ของเราต้องเป็น Publick
- ต้องติดตั้ง Giscus ใน Github ของเราด้วย เข้าไปที่ Giscus เลือก Configue จะแสดงหน้าแบบนี้

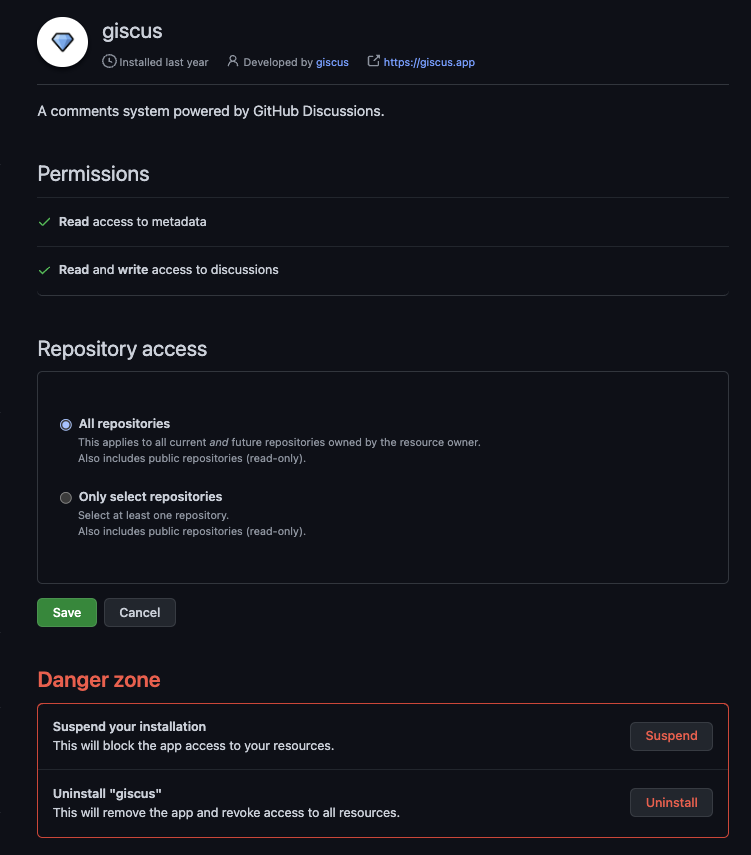
ตรง Repository access เลือกได้ว่าจะให้ใช้ได้แค่บาง repo หรือ ทุก repo และ Permissions บอกว่ายังเหลืออะไรบ้างที่เรายังไม่ enable
- ต้องไปเปิดการใช้งาน Discussions ที่ Repo ของเรา เข้าไปที่ Enabled Disscusions จะบอกวิธีการเปิดใช้งาน
ตั้งค่า
เข้าไปที่ Giscus จะเจอกับหน้าแบบนี้


เลือก repo ด้วยการใส่
username/repoเลือก Mapping path เมื่อมีคนมา Comments ในเมนู Discussions ของ Github จะจัด Group ตามที่เราเลือก ผมเลือก
pathnameก็จะได้แสดงแบบนี้เมื่อมีคน Comments


3.เลือก Discussions Category ผมเลือก Announcements
4.เลือก Feature สำหรับช่อง Comment ของเรา
5.เลือก Theme
เมื่อตั้งค่าเสร็จแล้ว ระบบจะสร้าง Script มาให้ เพื่อนำมาใส่ใน Project ได้เลย
<script src="https://giscus.app/client.js"
        data-repo="[ENTER REPO HERE]"
        data-repo-id="[ENTER REPO ID HERE]"
        data-category="[ENTER CATEGORY NAME HERE]"
        data-category-id="[ENTER CATEGORY ID HERE]"
        data-mapping="pathname"
        data-strict="0"
        data-reactions-enabled="1"
        data-emit-metadata="0"
        data-input-position="bottom"
        data-theme="preferred_color_scheme"
        data-lang="en"
        crossorigin="anonymous"
        async>
</script>
การใช้งาน
ผมใช้ template ของ tailwind-nextjs-starter-blog ซึ่งดีมากเลย มีการ config มาให้แล้วทั้งหมด ผมแค่นำมาใช้ แต่ผมจะอธิบายให้ฟังว่าต้องทำอะไรบ้าง
สร้างตัวแปรใน .env
แล้วนำค่าต่างๆที่เราตั้งค่ามาใส่
NEXT_PUBLIC_GISCUS_REPO=janescience/repo-name
NEXT_PUBLIC_GISCUS_REPOSITORY_ID=R_kgxxxxxxxx
NEXT_PUBLIC_GISCUS_CATEGORY=Announcements
NEXT_PUBLIC_GISCUS_CATEGORY_ID=DIC_kxxxxxxxxxxxxxxx
สร้าง Config
อ้างอิงตาม script ที่สร้างใน Giscus
comment: {
    provider: 'giscus', // supported providers: giscus, utterances, disqus
    giscusConfig: {
      repo: process.env.NEXT_PUBLIC_GISCUS_REPO,
      repositoryId: process.env.NEXT_PUBLIC_GISCUS_REPOSITORY_ID,
      category: process.env.NEXT_PUBLIC_GISCUS_CATEGORY,
      categoryId: process.env.NEXT_PUBLIC_GISCUS_CATEGORY_ID,
      mapping: 'pathname', // supported options: pathname, url, title
      reactions: '1', // Emoji reactions: 1 = enable / 0 = disable
      // Send discussion metadata periodically to the parent window: 1 = enable / 0 = disable
      metadata: '0',
      // theme example: light, dark, dark_dimmed, dark_high_contrast
      // transparent_dark, preferred_color_scheme, custom
      theme: 'light',
      // Place the comment box above the comments. options: bottom, top
      inputPosition: 'bottom',
      // Choose the language giscus will be displayed in. options: en, es, zh-CN, zh-TW, ko, ja etc
      lang: 'en',
      // theme when dark mode
      darkTheme: 'transparent_dark',
      // If the theme option above is set to 'custom`
      // please provide a link below to your custom theme css file.
      // example: https://giscus.app/themes/custom_example.css
      themeURL: '',
    }
}
สร้าง React Component
import React, { useState, useEffect, useCallback } from 'react'
import { useTheme } from 'next-themes'

import config from '@/data/config'

const Giscus = ({ mapping }) => {
  const [enableLoadComments, setEnabledLoadComments] = useState(true)
  const { theme, resolvedTheme } = useTheme()
  const commentsTheme =
    config.comment.giscusConfig.themeURL === ''
      ? theme === 'dark' || resolvedTheme === 'dark'
        ? config.comment.giscusConfig.darkTheme
        : config.comment.giscusConfig.theme
      : config.comment.giscusConfig.themeURL

  const COMMENTS_ID = 'comments-container'

  const LoadComments = useCallback(() => {
    setEnabledLoadComments(false)

    const { repo, repositoryId, category, categoryId, reactions, metadata, inputPosition, lang } =
      config?.comment?.giscusConfig

    const script = document.createElement('script')
    script.src = 'https://giscus.app/client.js'
    script.setAttribute('data-repo', repo)
    script.setAttribute('data-repo-id', repositoryId)
    script.setAttribute('data-category', category)
    script.setAttribute('data-category-id', categoryId)
    script.setAttribute('data-mapping', mapping)
    script.setAttribute('data-reactions-enabled', reactions)
    script.setAttribute('data-emit-metadata', metadata)
    script.setAttribute('data-input-position', inputPosition)
    script.setAttribute('data-lang', lang)
    script.setAttribute('data-theme', commentsTheme)
    script.setAttribute('crossorigin', 'anonymous')
    script.async = true

    const comments = document.getElementById(COMMENTS_ID)
    if (comments) comments.appendChild(script)

    return () => {
      const comments = document.getElementById(COMMENTS_ID)
      if (comments) comments.innerHTML = ''
    }
  }, [commentsTheme, mapping])

  // Reload on theme change
  useEffect(() => {
    LoadComments()
  }, [LoadComments])

  return (
    <div className="pt-6 pb-6 text-center text-gray-700 dark:text-gray-300">
      {enableLoadComments && <button onClick={LoadComments}>Load Comments</button>}
      <div className="giscus" id={COMMENTS_ID} />
    </div>
  )
}

export default Giscus
เรียกใช้งาน
import GiscusComponent from '@/components/comments/Giscus';

...

<GiscusComponent mapping={pathname} />
เสร็จแล้วครับ แต่ต้อง Comment ผ่าน Github user เท่านั้น ลอง Comment ดูได้ที่ข้างล่างนี้เลยครับ 👇